
Pond Filter Cleaning
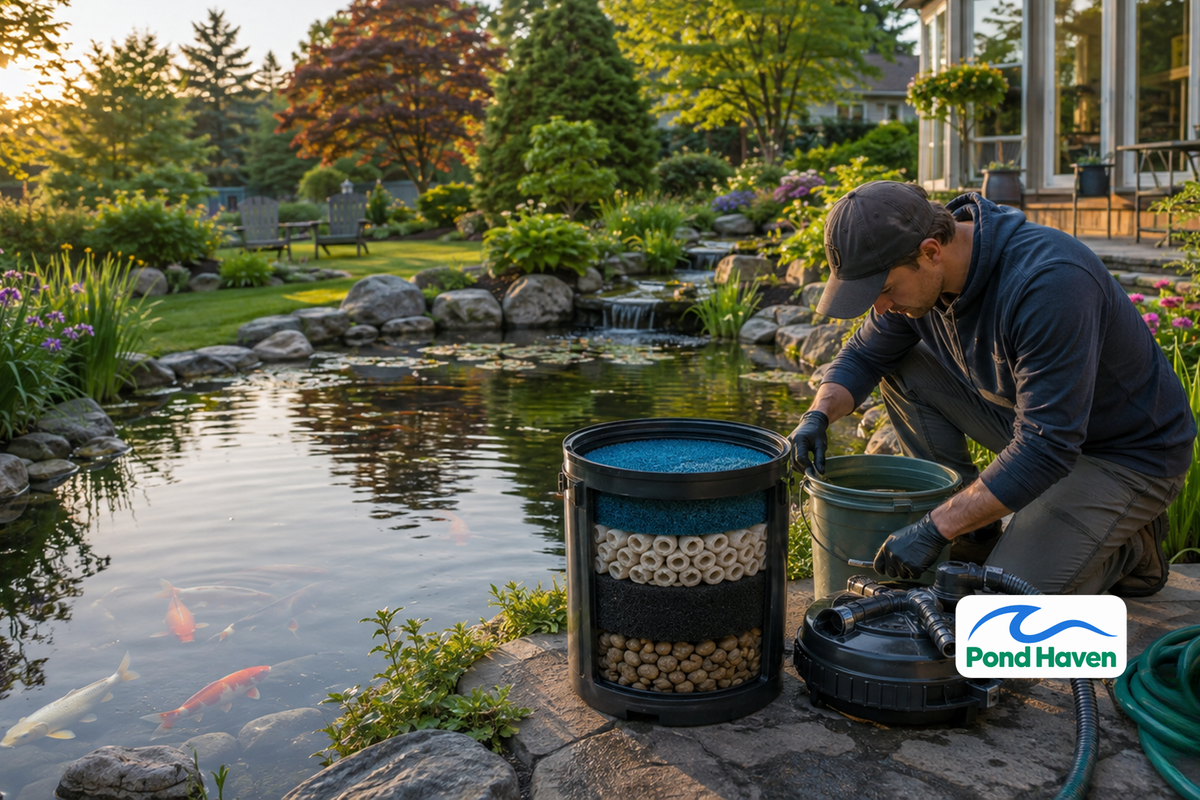

Cleaning your pond filter seems simple: pull out the media, hose it off, put it back. But that approach is exactly how most pond owners damage their filter while trying to help it.
Here's the paradox: over-cleaning destroys the beneficial bacteria your pond depends on. Rinse biological media under chlorinated tap water and you can wipe out the colony that converts toxic ammonia into harmless nitrate. The result? Green water, ammonia spikes, and stressed fish.
Every pond filter performs three jobs. Mechanical filtration captures leaves, sludge, and suspended solids. Biological filtration uses live nitrifying bacteria to break down fish waste. Chemical filtration removes odors, discoloration, and medications via carbon or zeolite.
Each type needs a different cleaning approach. This guide walks you through all three, step by step, with schedules, seasonal protocols, and troubleshooting for every filter configuration.
- Clean mechanical media (sponges, mats, brushes) every 1–2 weeks in pond water or with a hose.
- Clean biological media (ceramic rings, bio-balls, lava rock) only once per year, in pond water only. Never tap water.
- Replace chemical media (carbon, zeolite) every 6–12 months. It cannot be cleaned.
- Lubricate every O-ring with silicone-based lubricant. Never use Vaseline or petroleum products.
- Shut down equipment below 50°F. Restart above 55°F when bacteria become active.
Identify Your Filter Type First
Cleaning steps vary by filter configuration. Here's how to recognize what you own and what it demands.
Pressurized filters. Sealed canister units that push water back to the pond under pressure. They have a backwash valve and a pressure gauge. You clean them by running a backwash cycle or opening the housing. Always depressurize before opening the lid.
Gravity/box filters. Open-top units where water flows by gravity. Media lifts straight out for cleaning. These are the easiest to service but release debris into the water column if you're careless.
All-in-one/UVC filters. Combined pump, filter, and UV clarifier in a single unit. Disassembly order matters: unplug everything, then remove the UV assembly before the media chamber.
Drum filters. Self-cleaning mechanical filtration for larger ponds. The drum rotates and spray bars flush waste automatically. Minimal manual cleaning, but inspect the drum screen and spray bars monthly for clogs.
Skimmer filters. Pre-filtration for leaves and surface debris. Clean the basket weekly. Do not touch the biological media inside the skimmer unless it's visibly clogged.
Submersible filters. In-pond units attached to a pump intake. Cleaning frequency depends on bioload and pond size. Most have a removable cage, a pre-filtration sponge, and ceramic rings.
| Filter Type | Cleaning Method | Frequency |
|---|---|---|
| Pressurized | Backwash cycle or open housing | Backwash when pressure rises 8–10 PSI |
| Gravity/box | Lift out media, rinse in pond water | Mechanical weekly; biological yearly |
| All-in-one/UVC | Disassemble UV, then clean media | Mechanical weekly; UV sleeve monthly |
| Drum | Inspect screen and spray bars | Monthly inspection |
| Skimmer | Empty basket | Weekly during active season |
| Submersible | Remove cage, rinse sponge | Every 1–2 weeks |
Preparation and Safety: What to Do Before You Start
Power Isolation
Unplug the pump and UV clarifier before touching anything. This prevents electric shock, pump damage from running dry, and accidental UV exposure. Never reach into a filter with the pump connected.
UV Safety
Never look at an illuminated UV bulb. UV-C light causes severe eye and skin burns. Allow 10–15 minutes for the bulb to cool before handling. UV bulbs contain trace mercury, so handle carefully and dispose of spent bulbs at a hazardous waste facility.
Gather Your Tools
Collect everything before disassembly to minimize the time your filter is offline:
- Two buckets: one with pond water for biological media, one for waste
- Old towels or rags
- Soft-bristled brush (never wire brushes on plastic)
- Silicone-based O-ring lubricant
- Replacement media if needed
- Hose with a spray nozzle (for mechanical media only)

The Step-by-Step Cleaning Process
Step 1: Disconnect and Disassemble
Unplug the pump and UV unit. Close any isolation valves. For pressurized filters, open the purge or vent valve to release pressure before removing the lid. A pressurized chamber can release the lid violently.
Remove the filter lid or access panel. Lay out parts in order of removal. Photograph the internal arrangement of media layers before you touch anything. Reassembly in the wrong order compromises filtration.
Step 2: Clean Mechanical Media (Sponges, Mats, Brushes)
Mechanical media includes filter pads, sponges, brush cylinders, and filter floss. These capture physical debris before it reaches your biological media.
Rinse them in a bucket of pond water and gently squeeze. Don't wring or scrub until they look brand new. Even mechanical pads carry some beneficial bacteria in their biofilm.
You can use a garden hose for the first coarse rinse of heavily clogged pads. Mechanical media does not host the critical bacterial populations, so tap water here is acceptable. But a two-stage rinse works best: bucket of pond water first to capture the sludge, then a gentle hose rinse.
Clean mechanical media every 1–2 weeks during peak season. Heavily stocked ponds need it more often.
Physical signs it's time: reduced water flow at the waterfall, water backing up behind the media, or visible sludge buildup.
Step 3: Clean Biological Media (Ceramic Rings, Bio-Balls, Lava Rock)
This is where most pond owners cause damage.
Biological media hosts the nitrifying bacteria that convert ammonia to nitrite to nitrate. These bacteria are your pond's lifeline. Chlorine and chloramine in tap water kill them instantly.
The Golden Rule: clean biological media only in pond water, and only once per year.
Swish the media gently in a bucket of pond water to release loose sludge. Do not scrub. Do not use a hose. Do not use soap. The goal is to remove debris, not to sterilize the media.
Deep-clean biological media once per year, in spring or fall. New ponds under six months old should be cleaned even more conservatively, since their bacteria colonies are still establishing.
Never replace all biological media at once. If replacement is necessary, keep at least 50% of the old media to seed the new.
Step 4: Handle Chemical Media (Carbon, Zeolite, Phosphate Removers)
Chemical media includes activated carbon, zeolite, phosphate removers, and ion exchange resins. These work by adsorption, trapping pollutants until they reach saturation.
The key difference: chemical media is replaced, not cleaned.
You cannot rinse saturation out of activated carbon. Once it's full, it's done. Replace carbon every 6–12 months, or immediately after removing fish medications from the water.
Zeolite absorbs ammonia and can be recharged in a saltwater bath, but replacement is simpler and more reliable. Phosphate removers follow the manufacturer's schedule.
Indicator it's time: odors or discoloration return that the media was previously removing.
Step 5: Clean the Filter Housing and Pump Impeller
Rinse the empty housing with pond water. Wipe the interior with a soft cloth or brush. Never use soap or household detergents, which leave toxic residues.
The pump impeller is the most common failure point in pond pumps. Remove it gently, rinse it, and check for hair, string algae, or plant matter wrapped around it. Use a soft toothbrush and pond water to remove mineral scale. Never use sharp tools that could scratch the ceramic shaft.
A clogged impeller is the most common cause of weak water flow. Check it quarterly, or whenever flow noticeably decreases.
Step 6: Maintain the UV Clarifier
UV maintenance belongs in your filter cleaning routine because most UV units are integrated into the filter housing.
Clean the quartz sleeve every 2–4 weeks during algae season. Algae film blocks UV-C transmission. Wipe the sleeve with a soft cloth and white vinegar to remove mineral scale, then rinse with clean water.
Replace the UV bulb annually. UV output degrades over 12 months even if the bulb still glows visibly. A year-old bulb may look fine but deliver a fraction of its rated output.
Check the O-rings sealing the quartz sleeve. Leaks here let water into the electrical compartment, a serious safety hazard.
Step 7: Dispose of Waste Properly
Don't dump filter sludge back into the pond. It's concentrated organic waste that will decompose and release ammonia and phosphate, triggering algae blooms.
Filter sludge is nutrient-rich and excellent for gardens. Add it to compost piles or spread it on lawns and flower beds. Mix it with dry carbon-rich material like leaves or straw to balance the moisture. If garden application isn't practical, use municipal green waste bins. Never pour it down storm drains.
Reassembly, Sealing, and Restart
O-Ring Care: The Most Overlooked Step
Failed O-rings are the number one cause of filter leaks after cleaning. They dry out, crack, and collect debris.
Inspect every O-ring for cracks, flattening, or embedded debris. A flat edge indicates wear and the need for replacement. Apply a thin coat of silicone-based lubricant to all O-rings, gaskets, and threaded connections.
What to use: silicone-based lubricants only. Parker Super-O-Lube and DuPont MOLYKOTE 111 are safe for NBR, EPDM, FKM, and neoprene seals.
What never to use:
- Vaseline (petroleum jelly): causes swelling and elastomer breakdown
- WD-40 or spray lubricants: hydrocarbon-based, incompatible with most elastomers
- Soap and water: inconsistent film, reactivates in wet environments
- Solvent-based products: chemical attack on the rubber
Replace any O-ring with visible damage. Keep spares on hand for your filter model.
Priming the System
Running a pump dry burns out the motor. Prime before powering on.
For pressurized filters, fill the housing with pond water before sealing. For gravity filters, ensure the outlet pipe is submerged before restarting. Submersible pumps must be fully submerged.
Check all valves are in their operational positions. A left-open drain valve causes rapid water loss and potential pump burnout.
After restart, check water flow at the return outlet. Reduced flow indicates a clogged line, air lock, or improperly seated media. Monitor all joints and seals for at least 15 minutes for leaks.
Test ammonia and nitrite daily for two days after cleaning biological media. Any spike means the bacteria colony was compromised and needs support.
How Often to Clean Your Pond Filter
Frequency by Component
| Component | Frequency | Method |
|---|---|---|
| Skimmer basket | Weekly in season | Empty debris |
| Mechanical media (pads, sponges) | Every 1–2 weeks in summer; monthly in cool months | Rinse in pond water or hose |
| Biological media | Once per year (spring or fall) | Swish in pond water only |
| Chemical media | Replace every 6–12 months | Replace, don't clean |
| Pump impeller | Check monthly | Clean as needed |
| UV quartz sleeve | Every 2–4 weeks in algae season | Wipe with vinegar |
| UV bulb | Replace annually | Replace regardless of glow |
Frequency by Pond Conditions
Pond size. Smaller ponds need more frequent cleaning relative to volume. A 500-gallon pond with fish has less water to dilute waste than a 5,000-gallon pond.
Bioload. More fish means more waste. Heavily stocked koi ponds clog filters faster and need more frequent mechanical cleaning.
Season. Warmer water holds less dissolved oxygen and bacteria work faster. Cleaning frequency peaks in summer and drops in winter.
Plant coverage. Heavy planting reduces nutrient load and extends cleaning intervals. Plants compete with algae for the same nutrients.
Physical Signs Your Filter Needs Cleaning
- Reduced water flow at the waterfall or return
- Water level rising in a gravity-fed filter
- Visible sludge buildup on media
- Green water despite a functioning UV unit
- Fish gasping at the surface (low dissolved oxygen)
- A change in pump sound, from steady hum to higher-pitched whine
Seasonal and Winterization Guide
Fall Shutdown (Below 50°F)
50°F is the threshold. Bacterial activity drops sharply below this temperature, and ice can damage equipment.
Remove and clean all media. Store biological media in a bucket of pond water, not dry. Dried media loses its bacteria colony.
Remove pumps and filters from the pond before freezing. Store submersible pumps in a five-gallon bucket filled with enough water to keep them submerged. This keeps seals lubricated and prevents cracking.
Drain pressurized filters completely to prevent freeze damage. Store UV bulbs separately in a dry, cool place. Store all equipment somewhere above 60°F, like a heated garage or basement.
Spring Startup (Above 55°F)
55°F is when nitrifying bacteria become active. Don't deep-clean biological media in spring. You need every bacterium you can get to handle the spring bioload increase.
Reassemble the filter, clean mechanical media, and check all O-rings. Replace any that show cracking or hardening. Install a new UV bulb and clean the quartz sleeve before algae season begins.
If the filter was fully dried over winter, use a bottled nitrifying bacteria supplement to re-establish the colony. Test water parameters weekly for the first month. Reintroduce fish only after the filter has run for 48 hours and ammonia and nitrite read zero.
- Fall: remove and clean all media below 50°F
- Fall: store pumps submerged in a bucket of water
- Fall: drain pressurized filters completely
- Spring: replace all cracked or hardened O-rings
- Spring: install new UV bulb, clean quartz sleeve
- Spring: test ammonia and nitrite weekly for the first month

The Backwash Method (For Bead and Sand Filters)
Pressurized bead and sand filters trap waste in dense media that can't be cleaned by hand. They use a reverse-flow backwash cycle instead.
Backwash when the pressure gauge rises 8–10 PSI above the clean baseline reading. The EasyPro PBF series uses a six-position control head that sequences the cycles.
Cycle 1: Backwash. Water reverses through the vessel, entering from the outlet side and flushing trapped solids out the waste line. Run 2–3 minutes, or until the water in the clear waste line section runs clear.
Cycle 2: Rinse. Run water forward to settle the media bed and flush remaining debris. Run 30–60 seconds.
Cycle 3: Filter. Return the valve to the Filter position and verify normal flow.
Never backwash with the pump on full power. Excessive flow can fluidize the media and flush it out of the vessel. And don't over-backwash: excessive backwashing strips the biological layer from bead and sand media. Backwash only when pressure readings demand it.
Troubleshooting Common Post-Cleaning Problems
Green Water After Cleaning
Cause: You killed the beneficial bacteria and the nitrogen cycle stalled, or the UV bulb is old and the sleeve is fouled.
Fix: Stop cleaning so aggressively. Add a bacterial supplement. Check UV function and replace the bulb if it's over a year old. Expect 2–4 weeks for the cycle to re-establish.
Cloudy or Milky Water
Cause: Disturbed sediment released into the water column, or a bacterial bloom from disrupted biofilm.
Fix: Run the filter continuously. Don't feed fish for 2–3 days. Mechanical pads should capture the cloudiness within 24 hours. If it persists beyond 5–7 days, test ammonia and nitrite.
Ammonia or Nitrite Spikes
Cause: Biological media was cleaned in tap water or replaced entirely.
Fix: Perform a 25% water change. Add a nitrifying bacteria supplement. Don't feed for 48 hours. Prevention is simple: always clean biological media in pond water.
Leaks After Reassembly
Cause: Dried or damaged O-rings, or improper seating of the lid.
Fix: Inspect and lubricate all O-rings. Check that the lid is seated evenly. Tighten evenly, not excessively. Replace O-rings annually as part of spring startup.
Tools and Materials Checklist
- Two buckets (one for pond water, one for waste)
- Soft-bristled brush
- Silicone-based O-ring lubricant
- Replacement O-rings (check your filter model)
- Replacement UV bulb (annual)
- White vinegar for quartz sleeve cleaning
- Soft cloth for the UV sleeve
- Hose with spray nozzle (mechanical media only)
- Spare mechanical media (pads, sponges)
- Nitrifying bacteria supplement (for after deep cleaning)
- Ammonia, nitrite, and pH test kits

Conclusion and Key Takeaways
The Golden Rule: biological media gets pond water only, once per year. Mechanical media gets frequent rinsing. Chemical media gets replaced.
Lubricate every O-ring with silicone-based lubricant. Backwash pressurized filters when pressure rises 8–10 PSI. Shut down below 50°F. Restart above 55°F.
When in doubt, clean less, not more. Your filter's bacteria are its most valuable asset. Every cleaning decision should start with protecting them.
Frequently Asked Questions
Can I use tap water to clean my pond filter?
Only for mechanical media like sponges and filter mats. Never use tap water on biological media. Chlorine and chloramine kill nitrifying bacteria instantly, which can trigger ammonia spikes and fish stress. Always rinse biological media in a bucket of pond water.
How do I know if my filter needs cleaning?
Reduced water flow at the waterfall or return is the most obvious sign. Others include water rising in a gravity-fed filter, visible sludge on media, green water despite a working UV unit, and fish gasping at the surface. For pressurized filters, backwash when the pressure gauge rises 8–10 PSI above the clean baseline.
Why did my pond turn green after I cleaned the filter?
You likely killed the beneficial bacteria by over-cleaning, which stalled the nitrogen cycle and let algae take over. It can also mean the UV bulb is old or the quartz sleeve is fouled. Stop cleaning so aggressively, add a bacterial supplement, and check UV function. Expect 2–4 weeks for the cycle to re-establish.
How often should I replace the UV bulb in my pond filter?
Replace the UV bulb annually. UV output degrades over 12 months even if the bulb still glows visibly. A year-old bulb can deliver a fraction of its rated output, allowing algae to bloom. Clean the quartz sleeve every 2–4 weeks during algae season.
Can I clean my pond filter with vinegar or bleach?
White vinegar is safe for descaling the UV quartz sleeve. Never use bleach or household cleaners on any filter component. They leave toxic residues that kill bacteria and harm fish. For general cleaning, use pond water and a soft brush only.
What happens if I don't clean my pond filter at all?
Debris builds up and starves the biological media of oxygen, causing filter failure. Water flow drops, ammonia rises, and green water develops. In severe cases, ammonia toxicity can kill fish; any detectable ammonia is a problem, and levels above roughly 0.5 mg/L are dangerous. Mechanical media needs weekly attention; biological media needs yearly attention.