
How to Build a Pond
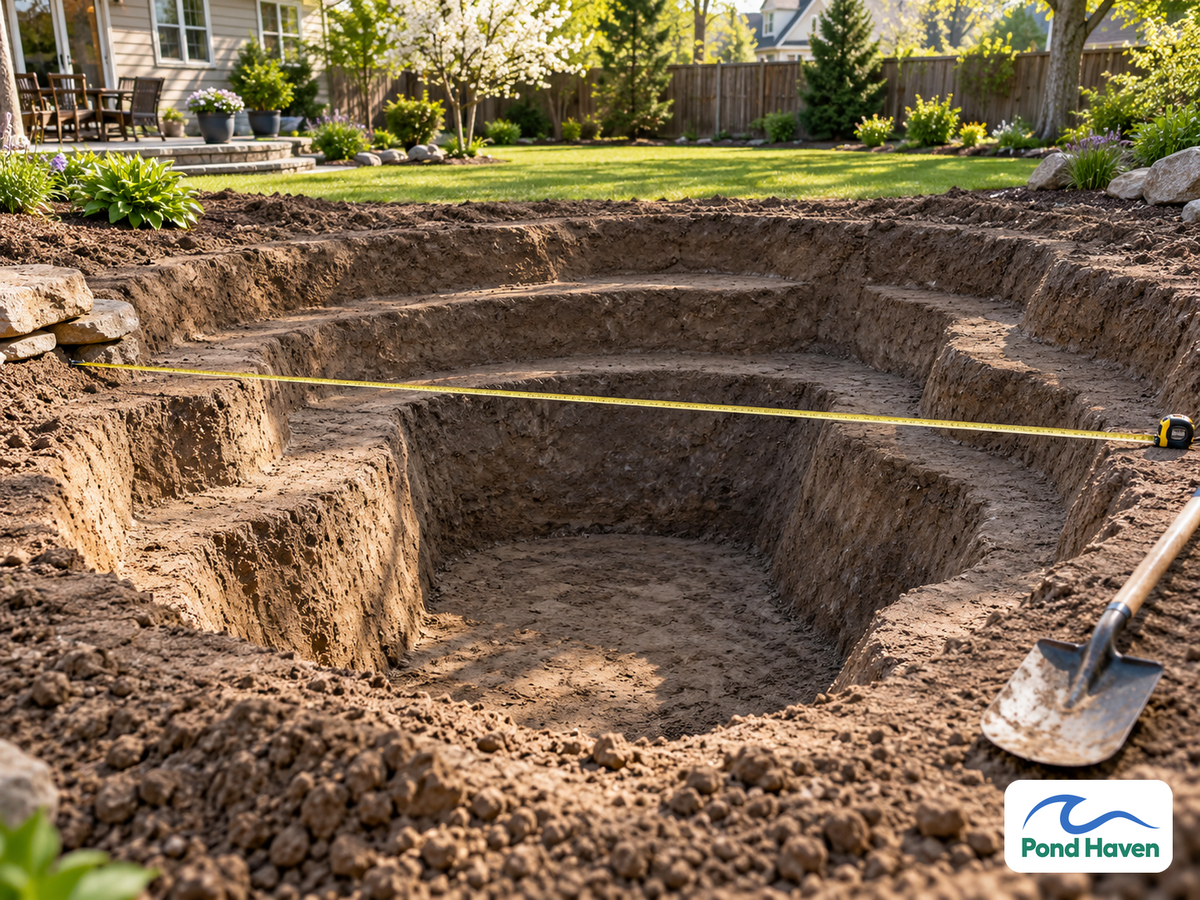

Building a pond is one of the most rewarding projects you can take on, but small mistakes become permanent problems. A poorly sited pond stays shaded and choked with leaves. A liner laid on unprepared ground gets punctured within a season. A filter that never cycles properly leaves you with green water and stressed fish.
This guide walks the real sequence from planning to first fill: siting, sizing, excavation, liner or natural sealing, edging, plumbing, and the biological cycling that must happen before fish ever touch the water. Whether you are digging a 200-gallon water garden or a half-acre farm pond, the order of operations is the same. Get the planning right and the digging is straightforward. Skip it and you will be rebuilding.
- Site for 4-6 hours of direct sun, away from deciduous trees, and call 811 before any digging.
- Depth drives everything: 18-24 inches for goldfish, 3+ feet for koi that overwinter, 8-12 feet for large fish ponds.
- Choose between a synthetic liner (EPDM, RPE, or PVC) and a natural clay seal early; the decision changes your entire construction method.
- Size your liner as length + (2 x max depth) + 2 feet of overlap on each side.
- Run your pump and filter for 4-6 weeks to establish the nitrogen cycle before adding fish.
Phase 1: Planning Your Pond
What Is Your Pond For?
Purpose drives every design decision. A decorative water garden with a few goldfish needs a fraction of the depth and filtration of a koi pond. A wildlife pond prioritizes shallow shelves and escape routes over crystal-clear water. A swimming pond or irrigation reservoir is an entirely different engineering project.
Be honest about what you want before you dig. Digging a pond twice because you undersized it the first time costs far more than building it right initially.
Choosing the Right Location
Sunlight. Aquatic plants need 4-6 hours of direct sun daily to thrive. More sun means healthier oxygenators and less algae, since plants outcompete algae for nutrients. Full shade suppresses plant growth and leaves you with a stagnant, green pool.
Trees. Avoid siting under deciduous trees. Falling leaves decompose into nutrient-rich muck that fuels algae and raises biological oxygen demand. Roots are the bigger threat: they can puncture liners and damage earthen dams. Clear all trees and roots within 15 feet of the pond edge.
Utilities. Call 811 at least three business days before you dig. This free national service marks buried gas, electric, water, and sewer lines. Hitting a utility line turns a weekend project into an expensive emergency. The service is mandated by the Common Ground Alliance and covers all 50 states.
Permits and HOA rules. Check local zoning before you commit. Many municipalities require permits for ponds over a certain depth or size, and some restrict structures near property lines. Your HOA may have its own rules about ponds, fences, and equipment visibility.
Power access. Pumps, filters, and aerators all need electricity. Locate the pond within reach of a GFCI-protected outdoor outlet, or budget for running a new circuit during excavation.
Sizing and Shaping Your Pond
Bigger ponds are easier to balance biologically. A larger water volume dilutes fish waste and resists temperature swings. If you are torn between two sizes, build the larger one.
Depth depends on what lives in the pond:
| Pond Use | Minimum Depth | Notes |
|---|---|---|
| Wildlife / decorative | 12-18 inches | Shallow shelves for marginal plants |
| Goldfish | 18-24 inches | Fish need depth to escape predators and heat |
| Koi (overwintering) | 3+ feet | Deeper water stays warmer at the bottom in winter |
| Fish production | 8-12 feet | Prevents thermal stratification and summer oxygen loss |
Create planting shelves as you dig. A typical layout has a 9-12 inch shelf around the perimeter for marginal plants, a 2-foot mid-depth zone, and a deeper central basin. This three-level structure gives you places to set potted plants at their correct depths.
Shape matters less than level edges, but curves look natural. Avoid straight lines and sharp corners, which read as artificial and create dead zones where debris collects.

Phase 2: The Critical Choice: Liner or Natural?
This decision comes before any digging. It determines your excavation method, your material costs, and how you handle leaks for the life of the pond.
Liner Ponds: The Reliable Option
Synthetic liners work on any soil type and give you complete control over the pond's shape. Three materials dominate the market:
EPDM rubber (45 mil) is the standard for most backyard ponds. It is flexible, conforms to irregular shapes and tight corners, and resists UV damage. Its puncture resistance is lower than reinforced options, so underlayment is mandatory. Most manufacturers rate EPDM for 20-30 years of service.
RPE (reinforced polyethylene) offers significantly higher puncture resistance than EPDM at roughly one-third the weight. It is the better choice for rocky soils and comes in single-piece sizes that eliminate seaming on large ponds. It costs more per square foot.
PVC is the budget option at around 14.5 mil thickness. It is lightweight and inexpensive but stiffens in cold weather and becomes brittle as plasticizers leach out. Plan on replacement after about 10 years.
Underlayment is not optional. A geotextile fabric (8 oz is standard) sits between the soil and the liner, protecting against sharp rocks, roots, and the gradual settling that creates pressure points. Skip it and you will be patching punctures within a few seasons.
Liner sizing arithmetic: length + (2 x max depth) + 2 feet of overlap on each side. A pond that is 10 feet long and 3 feet deep needs a liner at least 10 + 6 + 4 = 20 feet long. The same formula applies to width. Buy the closest standard size that exceeds both dimensions.
Natural (Linerless) Ponds: When They Work
A linerless pond holds water only if your soil contains enough clay to seal the basin. Test before you commit.
The ribbon test: Take a handful of moist soil and squeeze it into a ball. Roll it between your palms into a ribbon. If the ribbon holds together for 2 inches or more before breaking, you have workable clay content. If it crumbles immediately, your soil is too sandy.
You need at least 20% clay content for a self-sealing pond. Ideal soils are clay, silty clay, or sandy clay. Coarse sands and gravels will never seal, no matter how much you compact them.
Bentonite can seal a marginally porous basin. Spread granular bentonite at 1-3 pounds per square foot over the bottom, then mix it into the top few inches of soil and compact. Hydrated bentonite swells to fill voids. It works, but it is not a substitute for genuinely clay-heavy soil.
When not to go linerless: sandy soil, rocky ground, or a high water table. Rocky soil cannot be compacted into a seal. A high water table can lift and crack a clay seal from below. If any of these describe your site, use a liner.
Liner Pond Advantages
- Works on any soil type, including sand and rock.
- Complete control over shape, depth, and contours.
- Repairable with patch kits if punctured.
- Predictable 20-30 year lifespan with EPDM.
Liner Pond Disadvantages
- Higher upfront material cost.
- Requires underlayment and careful installation.
- Visible edges need finishing work.
- Liner can fail at seams or from UV exposure over decades.
Comparison Table: Liner vs. Natural Construction
| Factor | Liner Pond | Natural Clay Pond |
|---|---|---|
| Cost | $200-$1,000+ for materials | Lower if clay is present |
| Installation time | 2-5 days | 1-3 days |
| Flexibility in location | Any soil type | Requires clay soil |
| Repair difficulty | Moderate (patch kits) | Difficult (re-sealing) |
| Lifespan | 20-30 years (EPDM) | Indefinite if sealed well |
| Shape control | Complete | Limited by soil |
Phase 3: Step-by-Step Construction
Marking Out and Excavation
Outline the pond shape with spray paint or a garden hose. Step back and view it from every angle before you dig; adjusting a line on the ground is free, moving an excavated hole is not.
Dig in layers. Excavate the shallow perimeter shelf first, then the mid-depth zone, then the deep basin. This keeps you from over-digging the shelves while reaching for the bottom.
Level edges are critical. An unlevel perimeter shows immediately as a liner that is exposed on one side and submerged on the other. Use a long straight board and a spirit level across the pond's width, checking at multiple points. For larger ponds, a water level (a hose with two clear funnels) gives you a perfectly level reference across long distances.
Decide what happens to excavated soil before you dig. Good clay can build a raised berm or a naturalistic planting mound. Excess soil needs removal, which adds cost. Plan the logistics so you are not stuck with a pile of dirt you cannot place.
Preparing the Hole
For liner ponds, remove every sharp rock and root from the hole surface. A single overlooked stone becomes a puncture when the liner settles under water weight.
Add a 1-2 inch sand base across the bottom and shelves. Sand cushions the liner and fills small irregularities. Then lay the underlayment, overlapping seams by at least 12 inches and covering every surface the liner will touch.
For natural ponds, compaction is the whole game. Compact the clay in 6-inch lifts, using a plate compactor or the bucket of a backhoe. The goal is a dense, uniform seal with no soft pockets.
Installing the Liner
Center the liner over the hole and let it warm in the sun. Start filling with water slowly, working wrinkles out from the center toward the edges as the weight of the water pulls the liner into place. Do not try to smooth the liner while it is empty; the water does that work for you.
Leave 12-18 inches of excess liner around the perimeter. You need this material for edging, and trimming too early is a common mistake.
Edging Techniques
The edge finish hides the liner and prevents runoff from washing soil into the pond.
Rock edging is the most natural look. Place large, flat stones so they overhang the water slightly, hiding the liner while creating a clean visual line. Set smaller stones behind the big ones to lock everything in place.
Flagstone coping gives a walkable, formal edge. Set flagstones on a mortar bed or compacted sand base, with the inner edge overhanging the water by an inch or two.
Planting pockets let you soften the edge with vegetation. Use soil-filled planting bags or mesh baskets tucked between rocks on the shallow shelf. Marginal plants like pickerel weed (Pontederia cordata) and iris grow through the openings and naturalize the edge.
Grass or groundcover can grow right over the liner edge if you leave enough excess and cover it with a thin layer of soil. This works best on gentle slopes where runoff will not wash the soil away.
Filling and Initial Setup
Fill the pond slowly so the liner can seat itself against the contours. For ponds under a few thousand gallons, a garden hose works. Larger ponds may justify a water delivery truck, which fills faster and avoids running your well for days.
If you are adding fish immediately, dechlorinate tap water with a water conditioner. Chlorine and chloramine kill fish and the beneficial bacteria your filter needs. If you are cycling the pond before fish, dechlorination still matters because chlorine slows bacterial colonization.
Add plants before fish. Plants provide oxygen, shade, and surface area for beneficial bacteria. They also give fish cover, which reduces stress.
Phase 4: Water Life and Circulation
Introducing Plants
A balanced pond uses a four-zone planting strategy:
Oxygenators (anacharis, hornwort) grow fully submerged and produce oxygen while competing with algae for nutrients. Plant several bunches per square yard of surface area.
Floating-leaved plants (water lilies, spatterdock) shade the water surface, which directly reduces algae growth. Aim for 50-70% surface coverage once established.
Emergents (cattails, pickerel weed, arrowhead) grow in shallow water with their roots submerged and stems above the surface. They stabilize banks and filter nutrients.
Marginals (mint, loosestrife) grow in boggy soil at the pond's edge and provide habitat for insects and amphibians.
Plant in spring so plants establish through the summer. Fall planting gives roots too little time before dormancy.
Pumps, Filters, and Aeration
Your pump should circulate the total pond volume at least once per hour. Calculate volume as length x width x average depth x 7.5 gallons per cubic foot. A 10 x 8 foot pond averaging 2 feet deep holds roughly 1,200 gallons, so you need a pump rated at 1,200 GPH.
That rating is at zero head. Real-world resistance from pipe, fittings, and filters reduces actual flow, sometimes by half. Size up.
| Pond Volume | Minimum Pump Flow | Suggested Use |
|---|---|---|
| 500 gallons | 500 GPH | Small water garden |
| 1,000 gallons | 1,000 GPH | Goldfish pond |
| 2,500 gallons | 2,500 GPH | Koi pond with filter |
| 5,000+ gallons | 5,000+ GPH | Large pond with waterfall |
Filters come in two types. Mechanical filters (foam, brushes, settlement chambers) trap solid waste. Biological filters (bio-media, lava rock, matting) grow the bacteria that convert toxic ammonia to nitrite and then to nitrate. Most ponds need both. A pressurized filter combines them in one unit.
Waterfalls and fountains do more than look good. They aerate the water, which supports fish and beneficial bacteria. Moving water also discourages mosquitoes, which breed only in still water.
Diffused aerators matter for ponds deeper than 3 feet. Deep water stratifies thermally in summer, and the bottom layer can lose all its oxygen. A diffused aerator lifts oxygen-poor water from the bottom and circulates it to the surface.
Run the pump and filter for 4-6 weeks with plants in place before adding fish. This lets the nitrogen cycle establish, so ammonia never spikes when fish arrive.

Phase 5: Important Considerations
Safety First
Children. A pond of any depth is a drowning hazard for toddlers. Options include fencing, mesh covers, or designing a shallow beach entry that lets a child walk out. Constant supervision is non-negotiable.
Wildlife. Animals fall in and cannot get out. Build a sloping beach or place partially submerged rocks and logs at one edge so frogs, hedgehogs, and small mammals can escape.
Electrical. Every outdoor receptacle must be GFCI-protected. All pumps, lights, and aerators should plug into GFCI outlets, and connections should sit at least 12 inches above the pond's water level.
Permits and Regulations
Requirements vary by location, but common triggers include pond depth, size, and proximity to property lines. Farm ponds may qualify for agricultural exemptions. If your site is anywhere near a wetland, expect federal review under Section 404 of the Clean Water Act, which regulates dredging and filling in waters of the United States.
Check with your local building department before you dig. A phone call saves you from a stop-work order mid-project.
Ongoing Maintenance
Spring: Clean out debris, check the liner for damage, and restart the pump after winter shutdown.
Fall: Net the pond before leaves drop. Decaying leaves create a nutrient load that fuels spring algae.
Winter: In cold climates, keep a hole open in the ice with a de-icer so toxic gases can escape and fish get oxygen.
Algae: Barley straw, beneficial bacteria, and UV clarifiers all have their place. The real fix is balance: enough plants to outcompete algae, and not so many fish that their waste overwhelms the system.
Water testing: Keep pH between 6.5 and 8.5. Ammonia and nitrite should read zero once the filter cycles. If either climbs, reduce feeding and check your filtration.
Equipment: If your pump runs constantly but the water stays cloudy, or your aerator struggles to keep oxygen up on hot summer days, you are undersized. Upgrade before the problem kills fish.

Frequently Asked Questions
How much does it cost to build a pond?
Backyard pond costs range from a few hundred dollars for a small preformed or liner kit to several thousand for a large koi pond with waterfall and filtration. Farm ponds start around $3,500 per surface acre for basic excavation, though this varies widely by region and soil conditions. Material costs for a 10 x 12 foot liner pond typically run $400-$800 before plants and fish.
How deep should a pond be for fish to survive winter?
Goldfish survive winter in 18-24 inches of water. Koi need at least 3 feet. The key is that deeper water stays warmer at the bottom, and the pond must be deep enough that it does not freeze solid. In severe climates, run a de-icer to keep a hole open in the ice.
Can I build a pond without a liner?
Yes, if your soil contains at least 20% clay. Test with the ribbon test before committing. Sandy or rocky soil will not seal, and you will need a synthetic liner or bentonite amendment at 1-3 pounds per square foot.
How long does it take to build a backyard pond?
A small pond with a liner takes 2-5 days of work spread over a weekend or two. Larger ponds with excavation and edging take longer. The biological cycling before fish adds 4-6 weeks, so plan your stocking date accordingly.
What size pump do I need for my pond?
Your pump should circulate the total pond volume at least once per hour. Calculate volume as length x width x average depth x 7.5 gallons per cubic foot. Because real-world flow is reduced by pipe resistance and filter head, buy a pump rated 20-50% above your calculated minimum.
Conclusion
Start small if this is your first pond. A 500-gallon water garden teaches you the fundamentals of excavation, liner installation, and filtration without the cost and labor of a large project.
The liner vs. natural decision drives everything else, so make it early and make it based on your soil, not your preference. Test your soil before you dig.
Plan for the pond you want in five years, not just this season. Depth, size, and filtration are all easier to build now than to add later.
The pond will evolve with your experience. Your first season teaches you more than any guide. Build it well, cycle it patiently, and enjoy the process.